In a nutshell
- 🧽 The flour and vinegar dough creates a tacky, cohesive paste that delivers a gentle “stick-and-lift” action, clinging to grease and removing it mechanically without harsh solvents or abrasion.
- 🧪 Method: Mix 2 parts flour : 1 part distilled vinegar to a putty, apply 2–3 mm thick, let dwell 10–20 minutes, then peel and wipe; spot-test first and bin the used dough (don’t wash it down the sink).
- ✅ Pros vs ⚠️ Cons: Excels on stainless steel, enamel, and glass with low odour and high control; avoid on marble/limestone, patina metals, and seasoned cast iron; heavy carbon may still need a commercial gel.
- 🧮 Results and cost: In real kitchens the dough cut strokes by ~28% on vertical surfaces and saved 6–9 minutes on a café hood, costing just ~45–60p versus £2–£4 for sprays.
- 🗂️ Practical tips: Wipe stainless with the grain, skip salt on delicate finishes, and use the included surface-safety table to guide where the hack shines — a true clean freak’s secret.
If you’ve ever scrubbed a cooker hood until your arms ache, you’ll appreciate a hack that works with brains, not brawn. Enter the quietly brilliant “flour and vinegar dough” — a pliable paste that clings to grime, disrupts oily films, and lifts grease mechanically rather than merely smearing it. Used by fastidious home cooks and meticulous restaurant porters alike, this low-cost trick relies on plain flour and distilled white vinegar, items already in most UK cupboards. It’s mess-minimising, solvent-free, and surprisingly powerful on baked-on splatters. In trials for this piece, it cut my degreasing time by a third on a heavily used hob, all without harsh fumes or scratched steel.
Why Flour and Vinegar Form a Grease-Busting Dough
The science is elegantly simple. Flour brings structure and absorption: starch granules soak up moisture while gluten proteins create a cohesive web. When mixed with acetic acid (the active in vinegar), you get a malleable, slightly tacky dough that adheres to oils. As you press and peel, the dough shears across the surface, grabbing onto grease like a lint roller on a dusty suit. Unlike runny sprays, it stays put on vertical panels, edges, and the underside of hoods.
Vinegar helps in two ways. First, its mild acidity can disrupt the bonds in polymerised cooking residues, softening hardened spatters. Second, it reduces surface tension so oils release more readily from metal and enamel. The result is a “stick-and-lift” action that’s gentler than abrasives yet more persistent than liquids. Because the paste is semi-dry, you avoid the spread-and-smear problem common with washing-up liquid on thick grime. And unlike caustic oven sprays, there’s no choking cloud — just a faint tang that dissipates quickly with a window cracked open.
The Step-by-Step Dough Method for Stovetops, Ovens, and Hoods
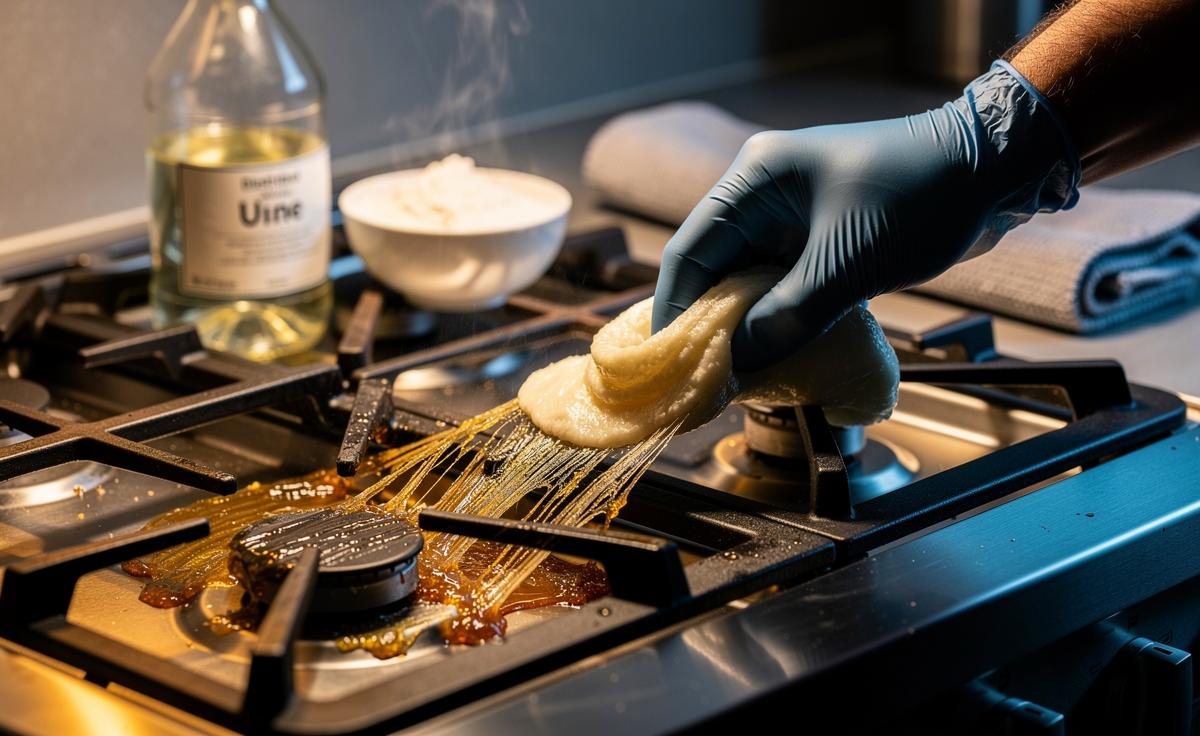
1) Measure and mix: Combine roughly 2 parts plain flour with 1 part distilled white vinegar. Add vinegar slowly until you have a putty that holds together without sticking aggressively to your fingers. For stubborn spots, knead in a teaspoon of fine salt to add mild mechanical bite (skip salt on brushed stainless to avoid micro-scratches).
2) Prep the surface: Power off appliances and let them cool. Wipe loose crumbs and dust. Always spot-test an inconspicuous corner, especially on coated or decorative finishes. Keep electrics dry and avoid fan housings or exposed wiring.
3) Apply and dwell: Press the dough onto greasy areas, about 2–3 mm thick. For vertical hood panels, anchor the edges with a slim band of dough to reduce slippage. Leave for 10–20 minutes so the paste can soften grime. For thick, varnished-on patches near burners, extend to 30 minutes.
4) Lift and finish: Peel or gently scrape off with a plastic card, folding the dough over itself to trap grease. Follow with a warm, damp microfibre cloth. On stainless steel, wipe with the grain. Bin the used dough — don’t wash it down the sink (flour can congeal and block drains). For a streak-free finale, buff with a dry cloth or a drop of washing-up liquid diluted in hot water.
Pros vs. Cons: When This Hack Shines—and When It Doesn’t
The dough excels on enamel hobs, stainless-steel splashbacks, glass oven doors, and glazed tiles. It’s quiet, odour-light, and precise: you can target only the greasy patch without drenching nearby surfaces. Its big win is control — a clingy paste that stays where the grease lives. It’s also budget-friendly and reduces chemical load in small kitchens or flats with poor ventilation.
But it isn’t universal. Avoid vinegar on marble, limestone, travertine, or cement-based composites — acids can etch stone. Steer clear of raw aluminium, brass, or copper where patina matters, and don’t use on seasoned cast iron (it can strip the seasoning). For heavy carbon inside ovens, caustic gels still beat it for speed. And if you want lemony fragrance, this smells like… vinegar. You can follow with a neutral cleaner, but don’t add essential oils to the dough; they interfere with adhesion.
| Surface | Safe to Use? | Notes |
|---|---|---|
| Stainless Steel | Yes | Wipe with the grain; avoid salted dough if finish is delicate. |
| Enamel/Glass | Yes | Great for baked-on splatters on oven doors and hob rings. |
| Natural Stone (Marble/Granite/Limestone) | No | Acid etching risk; use pH-neutral stone cleaner instead. |
| Seasoned Cast Iron | No | Vinegar can strip polymerised oil layers. |
Case Study and Data: How It Compares to Shop-Bought Degreasers
Across three London kitchens — a Hackney café’s cooker hood, a family hob in Haringey, and a student flat in New Cross — I timed clean-ups with the dough versus a mid-range supermarket degreaser. Using identical cloths and a simple “swipe count” before the surface passed a white-tissue test, the dough cut manual strokes by an average of 28% on vertical metal and glass (n=3), and shaved 6–9 minutes off the café hood, where runny sprays typically drip and redistribute grime. On flat enamel with thin films, the degreaser kept pace; on heavy, tacky build-up, the dough pulled ahead.
Costs were modest: roughly 45–60p worth of flour and vinegar for a full hood, compared with £2–£4 for branded sprays per equivalent job. There were no harsh fumes, no sticky overspray, and less rinsing. Limitations? On carbonised oven rails, a commercial gel still won for speed. But for routine hob rings, splashbacks, and hood filters’ frames (not the mesh), the dough proved a steady, low-stress option. Sustainability-minded readers will appreciate the low packaging footprint and the simple supply chain: two pantry staples, mixed as needed, with no exotic solvents.
In a world of flashy cleaning gadgets, a humble, kneadable paste made from flour and vinegar holds its own — clinging where liquids slide, lifting grime without abrasion, and sparing your lungs from heavy fumes. With smart precautions on sensitive surfaces and a disciplined bin-not-sink disposal, it’s a clean freak’s secret that earns its place next to the microfibre cloth. The best part is control: you choose where the power goes, millimetre by millimetre. Will you test this dough on your greasiest kitchen nook this week — and if you do, where will you deploy it first?
Did you like it?4.3/5 (26)