In a nutshell
- 🥶 Set fridge to ≤5°C, protect airflow, cool leftovers before chilling in shallow containers; keep milk on interior shelves, not the door.
- 🗂️ Create an “Eat Me First” box at eye level and practice FIFO; make near-dated foods visible to reduce decision friction and waste.
- 💧 Master moisture: use crisper drawers (high humidity for greens, low for fruit), line containers with kitchen paper, store mushrooms/berries in breathable packaging, and jar herbs with a loose cover.
- 🍎 Control ethylene and safety: separate producers (apples, avocados) from sensitive veg, keep raw meat on the bottom shelf in a tray, date leftovers (eat within 2–3 days), and wrap cheese in parchment.
- 🧽 Do a weekly two-minute reset: quick wipe, rotate items, refresh the “Eat Me First” tub, and plan uses—fewer off-odours, fresher greens, and lower bills.
Refrigerators are workhorses, but the way we load, set, and manage them often decides whether food thrives or spoils. In UK households, avoidable waste costs families precious money and time, yet the fixes are surprisingly simple. Below are practical, no-gadget techniques rooted in food safety and kitchen common sense. They use what you already have—shelves, drawers, containers, paper, and habits—to extend freshness and preserve flavour. Set your fridge to the right temperature, give air space, and keep the messiest risks contained. With these easy adjustments, you’ll protect ingredients, streamline weekday cooking, and cut your bin-bound leftovers without buying anything new.
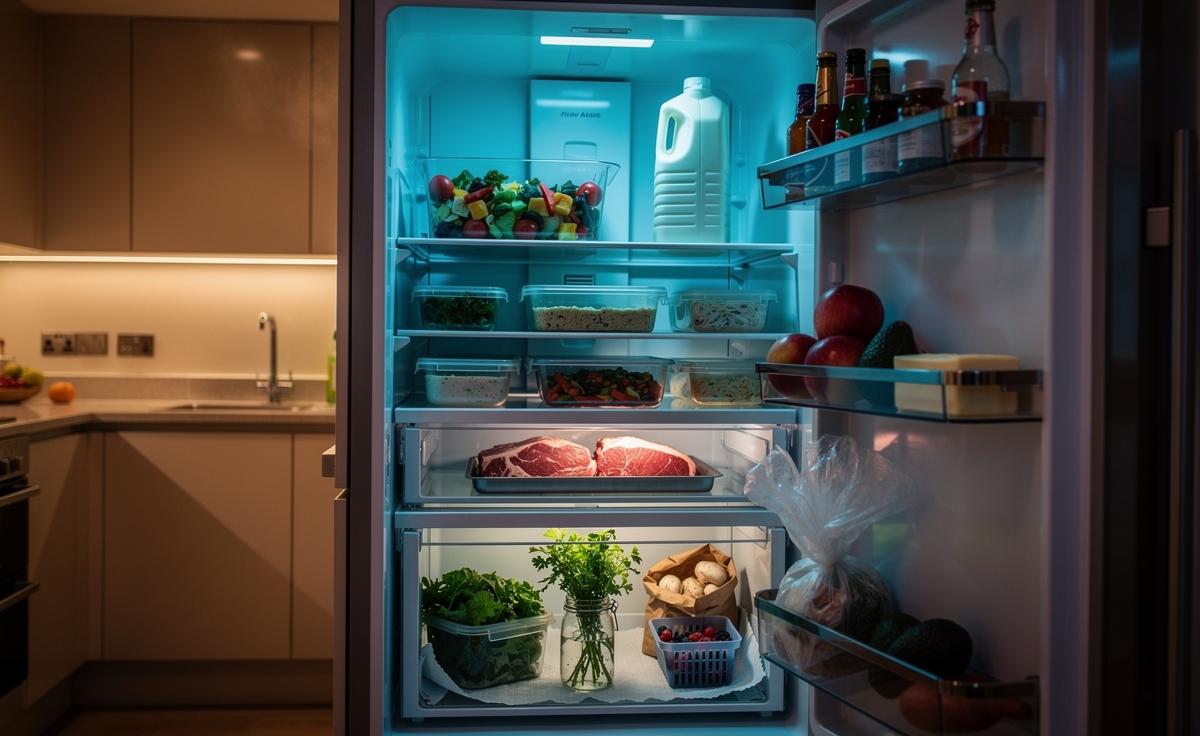
Set the Right Temperature and Protect Airflow
Your coldest ally is consistency. In the UK, guidance is clear: keep your fridge at or below 5°C to slow bacterial growth and preserve texture. Start by nudging the built-in dial so the centre of the cabinet stays cool and steady; many fridges run a touch warm on default settings. Then, resist overpacking. Airflow is your invisible cooling system, circulating cold air to corners and under shelves. If you block vents with tubs or jars, cold pockets become warm zones where dairy sours and greens wilt early. Cool leftovers quickly on the counter for 20–30 minutes before chilling, then store in shallow containers you already own to speed the chill and reduce condensation.
Placement matters. Milk and fresh juice prefer the interior shelves, not the door, which is the warmest area thanks to frequent openings. Keep ready-to-eat foods—cooked meats, dips, and desserts—on upper shelves where temps are most stable. Reserve the bottom shelf for raw meat, ideally in a lipped tray to catch drips and protect everything beneath it. Colder isn’t always better: turn the dial too low and delicate produce can suffer chilling injury—limp cucumbers, mealy tomatoes—while your energy bills climb. The goal is a steady, safe cool, not an arctic blast.
- Do: Leave a finger’s width around containers for airflow.
- Don’t: Put hot pans straight into the fridge; it warms the cabinet and nearby foods.
- Watch-out: Door shelves are for condiments, not milk or eggs you want to last.
Use Zones and the ‘Eat Me First’ System
Think of your fridge as a map with distinct zones. The top and middle are steady cool: ideal for ready-to-eat items—leftovers, yogurts, soft cheeses. The bottom shelf is cold and contained; that’s where raw meat and fish go, in a tray to prevent cross-contamination. Doors are warm—perfect for sauces, pickles, and butter. To stop food slipping past its best, set up an “Eat Me First” box on the eye-level shelf using any spare tub or baking dish. Into it go near-dated yogurts, half-open pesto, the last two wraps—anything that should be used within 48 hours. What’s visible gets eaten.
A simple rotation habit compounds the benefit. When you do a shop, slide newer duplicates behind older ones—the classic FIFO (first in, first out). A felt-tip note on lids (“Fri”, “Sun”) speeds decision-making for busy mornings. In one Bristol flatshare, we trialled a labelled tub and a stricter bottom-shelf rule for raw proteins; within two weeks, our group cut lunchbox waste and furry-cheese sightings by a third. The system works because it removes decision friction: you’re not rummaging, you’re following a plan. And it costs nothing.
| Fridge Zone | Best For | Why It Helps | Common Pitfall |
|---|---|---|---|
| Top/Middle Shelves | Ready-to-eat foods, dairy, leftovers | Stable temperature protects quality | Forgetting near-dated tubs at the back |
| Bottom Shelf | Raw meat and fish in a tray | Contains drips, reduces contamination | Balancing packs without a catch-tray |
| Crisper Drawers | Fruit and veg | Controls humidity to curb wilting | Mixing ethylene producers with sensitive greens |
| Door Shelves | Condiments, pickles, butter | Warmest zone suits stable foods | Storing milk or eggs here long-term |
Master Moisture: Crispers, Paper, and Breathable Wraps
Most spoilage is a moisture story. Leafy greens die by dehydration; berries spoil from trapped condensation. Use your crisper drawers to manage humidity: high humidity (closed vent) for leaves, herbs, and open-cut veg; lower humidity (open vent) for apples, pears, and citrus. If your drawers lack vents, mimic the effect: loosely cover greens in a bowl with a plate, or pop them in a repurposed produce bag with a couple of breathing holes. Dryness on the surface is your friend for berries and mushrooms. Store mushrooms in a paper bag, not airtight plastic, to stop them sweating into slime.
Before storing, remove any damaged leaves or bruised fruit—they accelerate decay around them. Line containers with a sheet of kitchen paper to catch excess moisture, especially for washed lettuce or chopped veg. For bunch herbs, trim the stems and stand them in a jam jar with a splash of water, then cover loosely with the produce bag: a mini greenhouse you already own. And a nuance worth noting: washing berries before storage often backfires by adding moisture. Instead, wash just before eating. If you must pre-wash salad, spin or pat it bone-dry, then layer with paper to maintain a crisp microclimate.
- Do: Keep greens in high humidity; line containers to absorb condensation.
- Don’t: Seal mushrooms and berries airtight; they need to breathe.
- Why “colder isn’t better” for veg: Near-freezing air breaks cell walls in lettuce and cucumbers.
Handle Ethylene and Cross-Contamination the Simple Way
Ripening gas, or ethylene, can be a silent spoiler. Apples, pears, kiwis, and avocados give it off; broccoli, leafy greens, and carrots are sensitive to it. The free fix: keep producers and sensitive items in separate drawers or on different shelves. If you’ve only one drawer, keep the greens in there and park the apples in the door. Egg cartons and butter can sit nearby without drama; greens, not so much. Separating ethylene producers from delicate veg buys you days of extra freshness, particularly for those midweek salads you mean to make.
Food safety doubles the gains. Always place raw meat on the bottom shelf in a tray to capture leaks, and keep marinating dishes covered. Decant leftovers into small containers to chill faster, label them with a date, and aim to eat within 2–3 days. Cheese fares better in breathable wrap (baking parchment under the original sleeve works) than in cling film that traps sweat. Eggs keep longer in their carton inside the main compartment, where temperatures are steady. Finally, adopt a two-minute reset every Sunday: wipe the bottom shelf, empty the “Eat Me First” tub onto your meal plan, and slide any new purchases behind the old. Small rituals prevent big waste.
- Pro of separation: Fresher greens and fewer off-odours.
- Con of mixing: Faster yellowing, bitterness, and limp textures.
- Bonus: A lipped tray under raw items prevents clean-up dramas.
These tweaks don’t require gadgets—just better use of space, temperature, and time. From an “Eat Me First” tub to humidity-savvy produce storage and a strict bottom-shelf rule for raw meat, each habit adds a small buffer against waste and foodborne risk. WRAP has long warned about costly household food waste; the good news is, most of it is avoidable with thoughtful fridge habits. Which of these changes will you try first this week, and what’s the one spoiled item you’re most determined to rescue from the bin next time?
Did you like it?4.7/5 (26)