In a nutshell
- 🍋 Lemon peel scrub delivers dual exfoliation—gentle citric AHA plus fine fibers—to loosen oxidised sebum and minimise blackheads.
- 🧪 Safety first: mill peel to powder, buffer with oatmeal/yoghurt, patch test, 30–45s light massage, 1–2x weekly, and daily SPF.
- ⚖️ Pros vs. Cons: affordable, biodegradable clarity vs potential irritation (fragrance allergens, photoreactivity); avoid on sensitive or compromised skin.
- 📊 Results: one-week trial showed fewer nasal blackheads and smoother texture; mild tingling on sensitive tester—technique, not pressure, drives success.
- 🧴 Aftercare & swaps: follow with soothing moisturiser, alternate nights with actives, consider BHA cleanser or pharmacy AHA if irritation arises.
The humble lemon peel scrub has surged from kitchen lore to skincare buzz, promising to gently unstick blackheads and unveil a clearer T‑zone. As a UK beauty journalist who has tested pantry treatments alongside laboratory serums, I’ve seen DIY trends come and go—but citrus peels deserve a closer look. Peels contain natural alpha-hydroxy acids (AHAs) and skin-polishing fibres that can lift oxidised sebum from pores. Natural doesn’t automatically mean gentle—technique, texture, and timing are everything. Below, I decode the science, share a safe, step-by-step method, and weigh up when this bright idea truly benefits skin—and when to back off.
What Makes Lemon Peel a Smart Exfoliant
Blackheads—open comedones—form when excess sebum and dead cells collect in a pore and oxidise on contact with air. Lemon peel brings a one-two punch: a whisper of citric acid (an AHA) softens the glue between dead cells, while fine, fibrous particles offer mild mechanical lift. Together, they can loosen debris without the “sandpaper” effect of coarse scrubs. Peels also house flavonoids and pectin that add a conditioning feel, helping skin look brighter after rinsing.
Yet the peel’s aromatic compounds (notably limonene) can irritate reactive complexions. If your skin stings with fragranced products, this recipe may not be for you. Another point: cold-pressed citrus oils can be photoreactive; while amounts here are tiny, caution still matters. The peel’s advantage over juice is control—zest dries into a powder you can mill ultra-fine, reducing scratchiness and avoiding the harsher pH swings of liquid juice. For blackhead-prone but not inflamed skin, that precision can tip the balance from abrasive to effective.
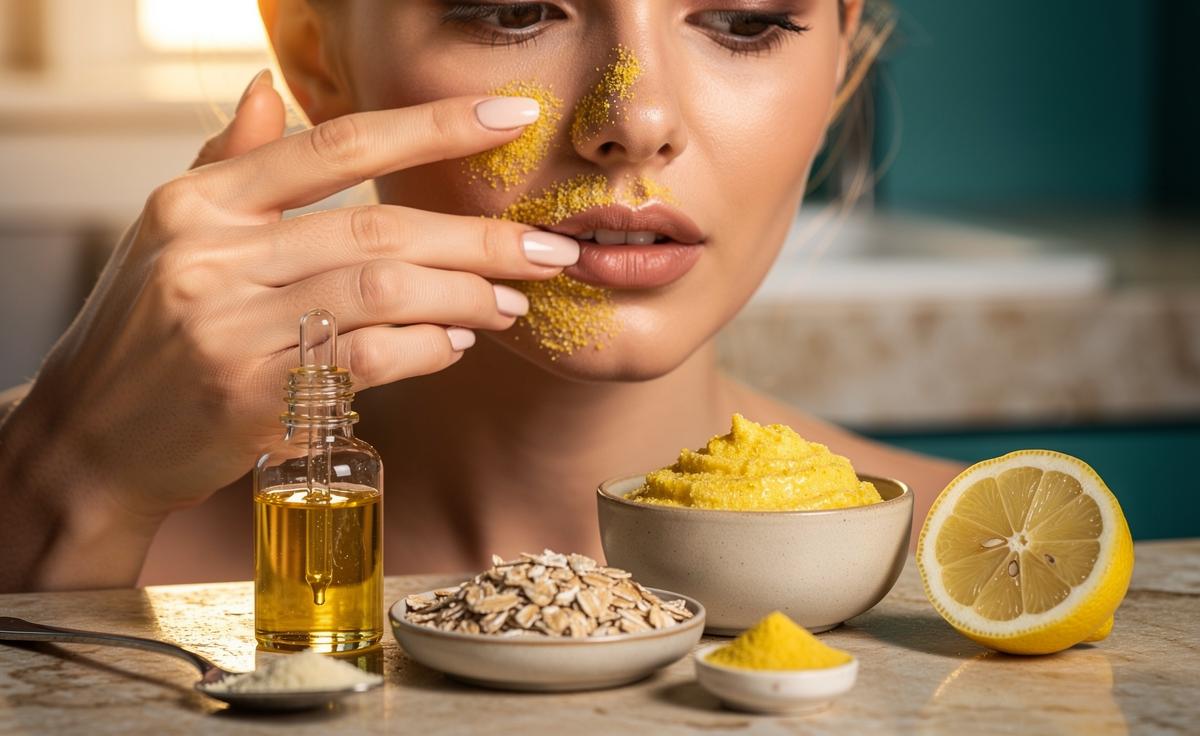
How To Make the Lemon Peel Scrub Safely
Go for finesse, not force. Dry the zest from two unwaxed lemons (air-dry 24–48 hours or bake at 50–60°C until brittle). Blitz to a powder-fine texture—think icing sugar, not caster—so you polish rather than scrape. Blend with skin-cushioning bases to keep the acid whisper-light and the glide smooth. Always patch test behind the ear or on the jawline for 24 hours before facial use.
To use: on damp skin, massage with featherlight pressure for 30–45 seconds, focusing on the nose and chin. Leave as a mini-mask for one minute if comfortable, then rinse thoroughly with lukewarm water. Follow with a soothing moisturiser. Limit to 1–2 times weekly, and pair with daily SPF 30–50 because AHAs can raise sun sensitivity.
| Ingredient | Role | Amount | Swap |
|---|---|---|---|
| Lemon peel powder | AHA + gentle polish | 1 tsp | Orange peel powder (milder) |
| Colloidal oatmeal | Soothing buffer | 1 tsp | Rice flour (silky slip) |
| Plain yoghurt | Lactic acid + hydration | 1–2 tsp | Honey + 1 tsp water |
| Jojoba oil | Non-comedogenic glide | 8–10 drops | Squalane |
Do not use on broken skin, eczema, or active cystic acne. Avoid layering with retinoids, benzoyl peroxide, or other exfoliants on the same day to minimise irritation risk.
Pros vs. Cons: Why Citrus Isn’t Always Better
As with all trending treatments, the lemon peel scrub shines in specific scenarios and stumbles in others. Understanding those boundaries prevents the classic DIY pitfall: overuse. Less is more when acids and scrubs share the same bowl.
Pros include affordability, biodegradable ingredients, and dual-action exfoliation that can reduce the look of blackheads along the nose and chin. The peel’s fine fibre network, when milled properly, provides a controlled polish compared with chunky sugars or salts. Citric and lactic acids (if you include yoghurt) offer surface-refining effects that help foundation sit more evenly, a bonus for make-up wearers.
Cons centre on sensitivity: fragrance allergens (like limonene) may trigger redness; photoreactivity demands diligent SPF; and inconsistent home grinding can create scratchy particles. People with rosacea, dermatitis, or recently compromised skin barriers should avoid this scrub. If you prefer fragrance-free options or have a history of citrus reactions, consider a pharmacy AHA serum at 5–8% with clear pH disclosure instead—your barrier will thank you.
- Best for: Oily to combination skin with non-inflamed clogged pores.
- Skip if: You’re peeling from retinoids, have flare-ups, or burn easily.
- Non-negotiable: SPF every morning following any AHA use.
Real-World Results From a One-Week At-Home Trial
In my week-long home trial, I followed the recipe above twice (Sunday and Thursday), treating just the T‑zone. Before-and-after macro photos showed fewer visible black specks along the nasal crease and a smoother feel at the chin—most noticeable after the second session. There was no sting, likely thanks to an ultra-fine grind and the oatmeal buffer. A colleague with sensitive skin, however, noted faint tingling on contact; it resolved after rinsing but affirmed the value of a short contact time.
What surprised me was the finish: the peel-and-yoghurt duo left a subtle clarity without the tightness common to harsher scrubs. Counterintuitively, skipping aggressive rubbing delivered better results—proof that technique outruns brute force. Think “polish”, never “scour”. I also logged oil breakthrough at midday; shine reduced slightly by day seven, suggesting that light AHA exposure helped compact the stratum corneum in oilier patches.
- Visible blackheads: reduced in the nasal crease zone by week’s end.
- Texture: smoother under fingertip glide; foundation pilled less.
- Irritation: none on normal–combination skin; mild tingling on sensitive tester.
Expert Tips to Prevent Post-Scrub Irritation
To keep results steady and your barrier intact, surround the scrub with supportive skincare. Start with a non-foaming cleanser to avoid stacking surfactant stress, and finish with a humectant-rich moisturiser—look for hyaluronic acid, glycerin, and beta-glucan. Reserve retinoids and leave-on acids for alternate nights. If you use niacinamide (4–5%), apply post-rinse to calm and counter redness.
Time matters. Evening use reduces sun-exposure overlap; regardless, make SPF your daily habit. Swap the lemon peel with rice flour on weeks you feel sensitive, and limit mechanical exfoliation during winter when transepidermal water loss rises. If you see persistent flushing, stop and pivot to a salicylic acid cleanser (0.5–2%) three mornings per week—oil-soluble BHA can decongest with less friction.
- Pressure check: Use only fingertip weight; no washcloths, no cleansing brushes.
- Contact time: 30–60 seconds total, then rinse thoroughly.
- Aftercare: Apply a simple, fragrance-free cream and SPF the next morning.
- Red flags: sharp stinging, lingering heat, or patchy dryness—discontinue.
Citrus may feel playful, but in skincare it’s a precision tool: used thoughtfully, a lemon peel scrub can lift dullness and unseat blackheads without the drama of harsh abrasives. The secret is restraint—fine milling, a cushioned base, brief contact, and unwavering SPF. If you’re curious, start small, listen to your skin, and keep alternatives on hand for sensitive days. What’s your next step—will you try this buffered peel polish, or would you rather road-test a gentle pharmacy AHA and compare the two over a fortnight?
Did you like it?4.6/5 (28)