In a nutshell
- 🔬 The science: citric acid (lemon) + acetic acid (vinegar) create a low‑pH solution; citric drives chelation of mineral crusts, acetic loosens polymerised grease, while citrus limonene and added surfactants finish the lift.
- ⚗️ Safe formula: mix 1:1 lemon juice and white vinegar (5%); for heavy grime add 1 tsp washing‑up liquid per cup; allow 5–20 minutes dwell, but don’t let it dry; ventilate and use gloves.
- 🧩 Surface rules: works on stainless steel, enameled grates, and glass‑ceramic (with care); avoid seasoned cast iron, bare aluminium/brass, and natural stone; always spot‑test, rinse, and dry.
- 🧽 Method: cool hob, remove parts, warm the mix, apply or poultice, wait, then scrub with a non‑scratch pad or nylon brush; on glass, a shallow‑angle razor scraper; finish by neutralising with bicarbonate of soda, rinse, and buff.
- 🚫 Critical cautions: never mix with bleach, ammonia, or peroxide; label and store briefly (up to a week); for milder smell use citrus‑peel‑infused vinegar; remember acids are tools, not cure‑alls.
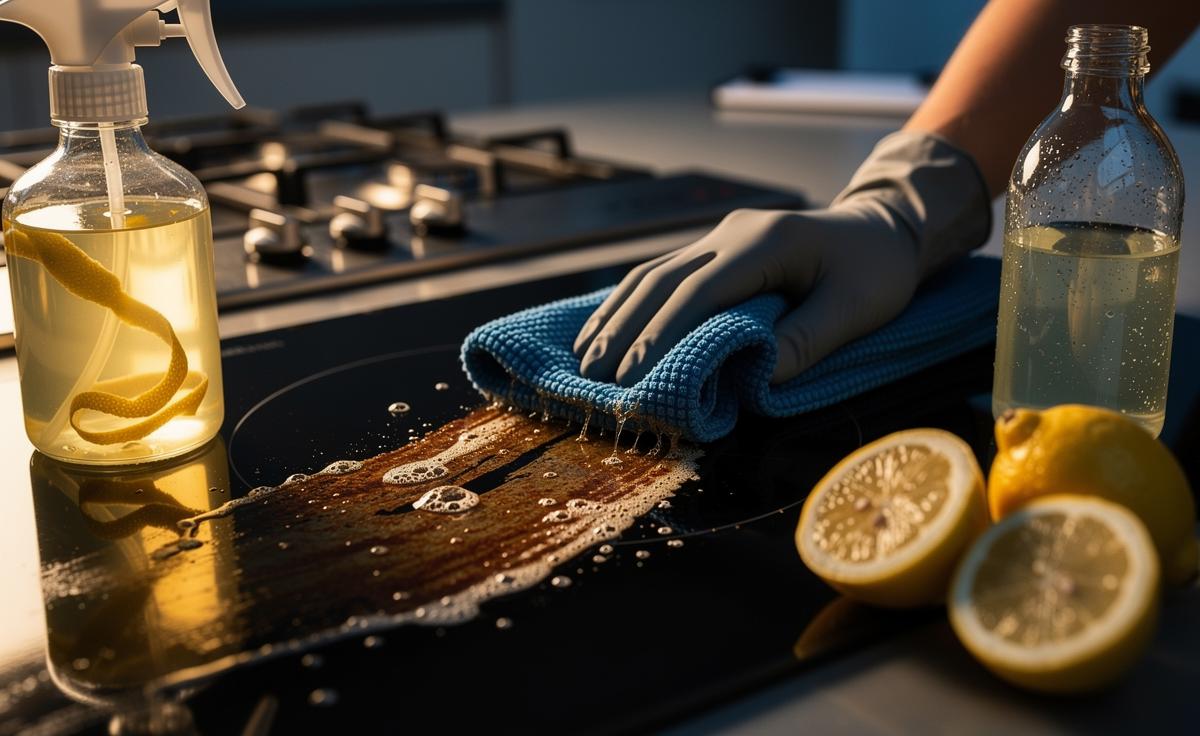
On British hobs that see daily action, splatter happens. Sauces spit, sugar caramelises, and oil bakes into a lacquer the colour of last night’s roast. Here’s a quietly brilliant fix hiding in your cupboard: a mix of lemon and vinegar. It’s cheap, fast, and surprisingly scientific. Citric acid chelates minerals, acetic acid loosens polymerised grease, and the citrus aroma cuts through kitchen funk. Used properly, it won’t scratch or smoke up the room. This is the sort of practical chemistry that earns a permanent place under the sink. Below, the how and the why—plus what to avoid—so your stove looks like you actually meant to keep it clean.
Why Lemon and Vinegar Team Up on Grease
Two acids, one mission. Lemon juice (citric acid) and white vinegar (acetic acid) create a low-pH bath that attacks two enemies at once: mineral crusts from hard-water splashes and the browned film of cooked fats. Citric acid is a champion chelator, binding to calcium and magnesium so they lift easily from enamel or stainless steel. Acetic acid weakens the sticky matrix in burnt-on residues, helping a cloth or non-scratch pad shear the grime away. Add a few drops of washing-up liquid and you introduce surfactants that emulsify loosened oils, so they rinse clean rather than smear.
There’s a bonus if you include a little zest. The peel contains limonene, a gentle solvent that loves lipids. Twist a strip over the bowl to express oils, drop it in, and swirl. Acidity does the heavy lifting; citrus oils finish the job with a shine and a fresh scent. Expect fewer harsh fumes than ammonia cleaners, and no chalky residues left by alkaline pastes. Just remember: acids don’t “melt” fat on their own. Heat, time, and surfactants are your allies. That synergy is why the mix works when plain elbow grease fails.
Safe Ratios, Surfaces, and Soak Times
Start simple: mix 1 part lemon juice with 1 part white vinegar (5% acetic acid). For heavy grime, add 1 teaspoon washing-up liquid per cup to emulsify oils. For gentle abrasion on gritty rims, sprinkle fine salt onto the cloth, not the glass. Keep contact time sensible: 5–10 minutes for light films; up to 20 minutes for baked spills. Never let acidic solutions dry on the surface—dry edges can etch or leave tide marks. Always test on an inconspicuous spot first, especially around printed markings and trim.
| Surface | Compatibility | Typical Dwell Time | Notes |
|---|---|---|---|
| Stainless steel hob | Yes | 5–15 min | Wipe with the grain; rinse and dry to prevent flash rust. |
| Enameled grates | Yes | 10–20 min | Use nylon brush; avoid metal scouring pads. |
| Glass-ceramic top | Yes, with care | 3–8 min | Do not use salt abrasives; keep solution from drying. |
| Cast iron seasoning | No | — | Acid strips seasoning; clean with hot water and brush only. |
| Bare aluminium or brass parts | Limit | 1–3 min | Can pit or tarnish; quick wipe and immediate rinse. |
| Natural stone (granite/marble) | No | — | Acid etches stone; use pH-neutral cleaner. |
Ventilation matters. The mix is mild, but you’re still working with acids. Keep windows cracked, and wear gloves if your skin is sensitive. Do not mix with bleach or peroxide products—dangerous gases and peracetic acid can form. Rinse metal parts thoroughly and dry with a microfiber towel to stop water spots.
Step-by-Step Method With Pro Tips
1) Power down and cool the hob. Remove grates and burner caps. Brush away crumbs so the acid targets only the stains. 2) Warm the solution slightly in a heat-safe jug—hand-hot, not boiling. Warmth speeds chemistry. 3) Spray or pour onto the soiled zones until glistening. For vertical edges, press on a soaked paper towel as a poultice to keep the liquid parked on the grime. 4) Wait. Five minutes for light mess; up to twenty for the stubborn ring around pans.
Now scrub. Use a non-scratch pad on enamel and stainless, a nylon brush on grates, and a dedicated razor scraper held at a shallow angle on glass-ceramic for brittle caramelised spills. Re-wet as needed. If the rag slides but the smear lingers, add two drops of washing-up liquid and try again—the surfactant is the missing piece. For removable grates, soak them in a sink with the mixture and hot water, then brush in the corners.
To finish, a clever trick: after the acid has done its work and been mostly wiped away, dust a pinch of bicarbonate of soda onto damp patches and wipe—gentle fizz lifts residues and neutralises lingering acid. Rinse with clean water, then buff dry. A last pass with a lemon-zest-infused cloth adds a bright, streak-free sheen and a kitchen that smells like you meant it.
When Not to Use Acid Cleaners (and What to Do Instead)
Skip acids on anything that relies on a protective film. Seasoned cast iron will lose its hard-won patina. Bare aluminium can pit, and brass burner parts may tarnish if left soaking. Natural stone—granite, marble, limestone—etches easily. Printed control labels and delicate trims can fade if you scrub them while wet with acid. If you’re unsure, treat a hidden corner first and wait an hour to check for dulling or colour change. For these sensitive areas, choose a pH-neutral spray, or just hot water and a drop of washing-up liquid, then dry promptly.
There are mixing don’ts that matter. Never combine your lemon-vinegar solution with bleach, ammonia, or oxygen bleach powders. The risks range from lung-irritating fumes to hazardous reactions. Work in short sessions, ventilate, and store the mix in a labelled bottle for up to a week, as fresh citrus can ferment. If odours bother you, infuse citrus peels in vinegar for seven days, strain, and dilute 1:1—milder smell, same bite. The broader point: acids are tools, not cure-alls. Use them where their low pH and chelation shine, and reach for other methods when the material demands it.
Handled with care, the lemon–vinegar duo is a reliable, low-cost answer to the sticky, streaky reality of British stovetops. It exploits simple chemistry—acidity, chelation, and light solvent action—to undo what heat and time have baked on. The routine is quick once learned, and the results look like you hired help. One bottle, many messes, minimal faff. What’s the one stubborn stain on your hob that has refused every cleaner so far, and how would you put this mix to the test on it next?
Did you like it?4.4/5 (29)