In a nutshell
- 🍋 How it works: vinegar (5% acetic acid) plus lemon (citric acid, limonene) lowers pH to ~2–3 to degrease, descale, and deodorise; sufficient contact time reduces common bacteria, but it’s not a registered disinfectant.
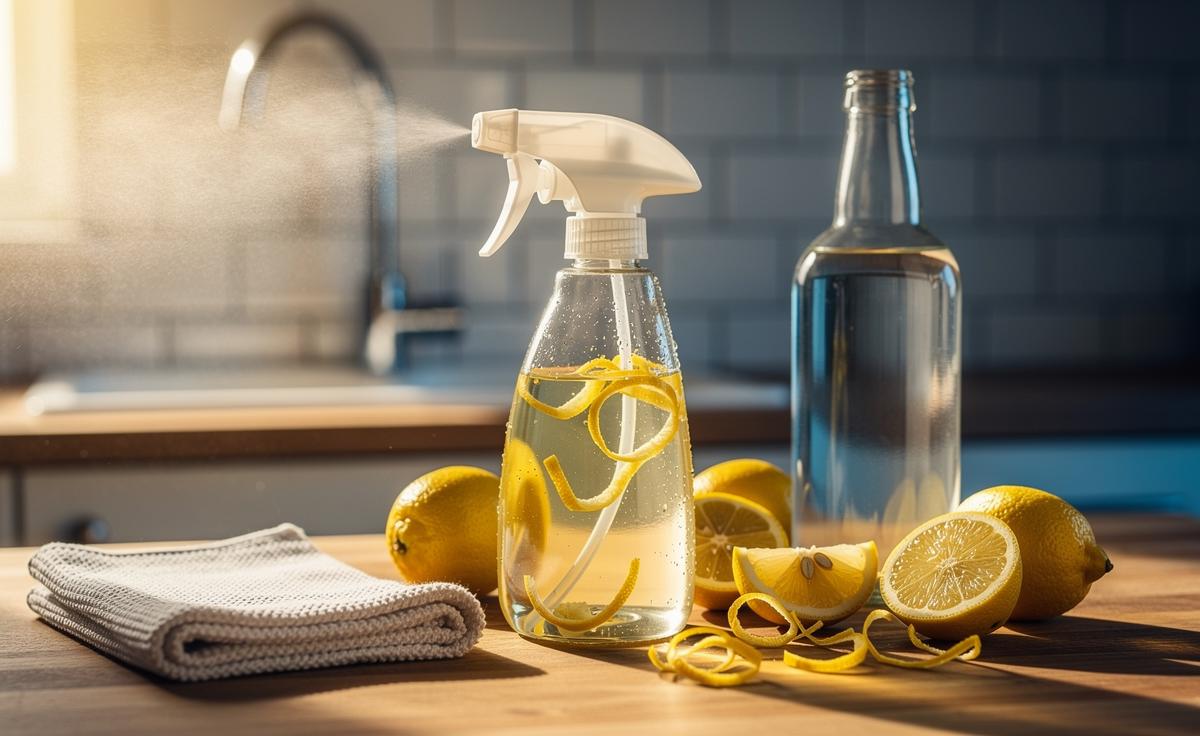
- 🧪 Recipe and dilution: infuse lemon peels in vinegar for 7–14 days, strain, then use a 1:1 dilution for daily cleaning or 2:1/neat for limescale; spray, wait 5–10 minutes, wipe or rinse.
- ⚠️ Safety first: do not mix with bleach or ammonia; avoid natural stone, aluminium, cast iron, and some unsealed wood; patch-test surfaces, label the bottle, keep from children, and use gloves if skin is sensitive.
- 🧼 Best uses and limits: shines on sealed worktops, tiles, glass, kettles, and fridges; not for raw meat spillages on porous surfaces, deep mould, or homes with immunocompromised people—use approved disinfectants when risk rises.
- 🌍 Practical wins: low-cost, upcycles peels, reduces plastic and fragrance load, and trims transport footprint; trade-offs include etching risks and outcomes that rely on proper method and dwell time plus sensible storage.
Britain’s cupboards are full of branded sprays, yet readers tell me they crave something simpler, thriftier, kinder to the planet. Enter the lemon-and-vinegar cleaner: a kitchen-made blend that cuts grease, busts odours, and can reduce microbes on everyday surfaces. It’s low-cost. It’s quick. It smells like sunshine after rain. Crucially, it swaps harsh synthetics for pantry staples while still taking hygiene seriously. Used properly, this duo offers credible cleaning power for low-risk, day-to-day messes and a surprising degree of microbial control. But it’s not a silver bullet. Understanding what it can do—and where it falls short—makes the difference between a wholesome habit and a risky shortcut.
How Lemon and Vinegar Cleaners Work
Vinegar’s bite comes from acetic acid (usually 5%), while lemon contributes citric acid and aromatic compounds such as limonene. Together they lower pH to roughly 2–3, an acidic zone that can disrupt microbial cell membranes, dissolve mineral deposits, and loosen grime. That’s the cleaning trifecta: degreasing, descaling, deodorising. The acids also chelate metal ions in hard-water residue, making limescale vanish from taps and tiles. On cutting boards or sealed counters, sufficient contact time—several minutes, not seconds—can reduce common bacteria like E. coli and Salmonella.
There are limits. Household vinegar is not an officially registered disinfectant in the UK and may be less reliable against hardy pathogens, spores, or some viruses. Lemon’s zest oils lend a fresh scent and added cutting power, but they’re not a hospital-grade antimicrobial. Think of this as a sanitising approach for everyday, low-risk cleaning. Reserve bleach or alcohol-based products for high-risk messes, bodily fluids, or situations involving vulnerable people. Used with patience, ventilation, and the right surfaces, the lemon-vinegar duet delivers impressive results—particularly on kitchens and bathrooms that see routine soil rather than severe contamination.
A Step-by-Step Recipe and Safe Dilutions
Start with a clean jar. Add the peels from 2–3 lemons, cover with standard 5% white vinegar, and seal. Infuse for 7–14 days in a cool cupboard, shaking occasionally. Strain. For everyday cleaning, dilute the infused vinegar 1:1 with water in a spray bottle. For tougher limescale or greasy hob splatters, use it neat or dilute 2:1 (vinegar to water). Spray, wait 5–10 minutes, then wipe with a clean cloth or rinse. Never mix vinegar with bleach; the reaction releases dangerous chlorine gas. Do not add ammonia. If you prefer to skip infusion, add 1–2 tablespoons of fresh lemon juice per cup of vinegar just before use.
Safety matters. Wear gloves if you have sensitive skin. Patch-test on an inconspicuous spot. Do not use on marble, limestone, travertine, concrete, or any natural stone; acid can etch the surface. Avoid cast iron (it strips seasoning) and some unsealed wood. Keep the bottle away from children and pets, and label it clearly. For glass, buff with a dry microfibre after wiping to prevent streaks. For chopping boards, scrub first with hot soapy water, rinse, then apply the solution and leave for a full 10 minutes before rinsing again.
| Surface | Dilution | Contact Time | Notes |
|---|---|---|---|
| Sealed worktops | 1:1 vinegar to water | 5–10 minutes | Rinse or wipe with damp cloth |
| Glass and mirrors | 1:1 | 1–2 minutes | Buff dry to avoid streaks |
| Bathroom tiles | Neat or 2:1 | 10 minutes | Lifts limescale; ventilate area |
| Chopping boards (non-porous) | 1:1 | 10 minutes | Clean first; rinse thoroughly |
| Natural stone | None | — | Do not use—risk of etching |
Where This DIY Disinfectant Shines—and Where It Doesn’t
This blend excels in kitchens and bathrooms where soils are routine, not hazardous. Greasy cookers, splashback smears, kettle crust, and soap scum yield quickly to acidity. Fridges benefit too: wipe shelves, leave for several minutes, then rinse for a fresh, lemony finish that doesn’t taint food. Reusable lunch boxes often shed odours after a soak in the 1:1 solution. On shower glass, a neat application tames hard-water haze and restores sparkle. Its low cost encourages liberal use, which helps achieve that crucial, bacteria-busting contact time. In shared flats, it also sidesteps fragrance-heavy cleaners that can irritate sensitive noses.
But boundaries matter. Do not rely on lemon and vinegar for spillages involving raw meat juices on porous surfaces, nor for any sanitation task in a household with immunocompromised people. For mould, it may fade light staining on tiles, yet deeper fungal issues demand targeted fungicides and moisture control. Avoid electronics screens and aluminium, which can pit under acid. Pet owners should be mindful: citrus oils can bother cats, and concentrated limonene may irritate. In nurseries or food businesses, stick to approved disinfectants and document dwell times. The DIY route is brilliant for everyday sparkle; it is not your all-hazards arsenal.
Cost, Sustainability, and Practical Trade-Offs
A litre of supermarket white vinegar often costs less than a small branded spray. Add leftover lemon peels, and you’ve upcycled food waste into a multipurpose cleaner. Refilling a durable spray bottle cuts plastic, while the low-tox profile reduces harsh residues indoors. That’s attractive in tight urban flats and draughty farmhouses alike. The scent? Bright at first, then it fades—no cloying perfumes. Transport emissions drop too when you’re not shipping water-heavy cleaners across continents. For many households, the economics and ecology align neatly.
There are trade-offs. Acids can damage the wrong surfaces. The solution is not a legally registered disinfectant, so workplaces and high-risk settings are out. Results hinge on method: pre-clean visible soil, apply generously, and wait the full dwell time. Storage matters as well—keep the bottle capped, out of sunlight, and use within a couple of months for best aroma and potency. Label it clearly and keep it out of reach of children. If you need guaranteed, broad-spectrum kill claims, pair this routine with targeted products for occasional deep cleans. Smart cleaning is about choosing the right tool for the right job.
Lemon and vinegar offer a crisp, low-cost path to cleaner homes, realistic sanitation, and less plastic under the sink. They’re not magic, yet they’re mighty when used with patience, surface savvy, and a respect for dwell time. You’ll save money. You’ll simplify. And you might even enjoy cleaning again—the citrus glow helps. The key is judgment: deploy the DIY duo for everyday sparkle, reach for approved disinfectants when risk escalates, and keep your toolkit flexible. How will you adapt this approach to your own rooms, routines, and priorities?
Did you like it?4.7/5 (25)