In a nutshell
- ✨ Why it works fast: Hydrogen peroxide oxidises organic stains while baking soda delivers gentle abrasion and alkalinity; the paste clings to grout, lifting grime quickly—avoid natural stone and patch test coloured grout.
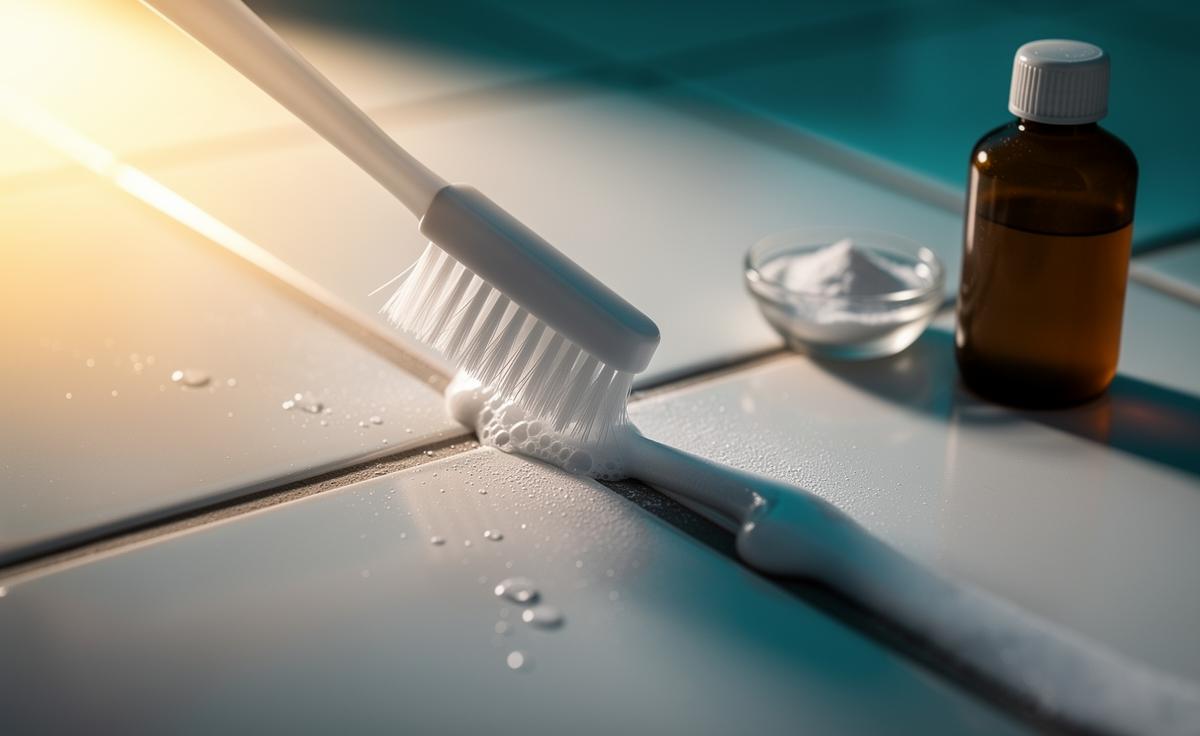
- 🧪 Simple method: Mix 2 parts baking soda : 1 part 3% hydrogen peroxide, apply, let dwell 5–10 minutes, scrub with a nylon brush, then rinse and dry—make it fresh each time.
- 🚫 Safety first: Do not mix with bleach, ammonia, or vinegar; avoid metal brushes, ventilate, use light gloves if needed, and test epoxy or coloured grout in a hidden spot.
- 🛠️ Troubleshooting: Biofilm may need a second cycle; deep-set mould can recur without humidity control; hard-water haze buffs off—finish with a penetrating sealer once fully dry.
- 🗓️ Maintenance wins: Squeegee after showers, weekly wipe with warm water and a little baking soda, run the fan 15 minutes, keep a grout brush handy, and reseal every 12–24 months.
Grout turns dingy quietly. One week it’s cream; the next it’s a grey map of showers, spills, and life. Here’s the blunt truth: you don’t need harsh bleach or pricey kits to lift that grime. The simple pairing of hydrogen peroxide and baking soda creates a quick, effective paste that restores brightness in minutes. It’s affordable. It’s science-backed. And it’s gentle enough for routine use on most ceramic and porcelain surfaces. Make it fresh, apply generously, give it time to fizz, then scrub and rinse—your grout will pop again. Below, the why, the how, and the savvy precautions professionals actually follow.
Why This Paste Works So Quickly
Two household staples, one powerful reaction. Hydrogen peroxide (3%) is an oxygen-releasing oxidiser that breaks down organic stains—body oils, soap scum, food spills—without the sharp odour or corrosiveness of chlorine bleach. Baking soda, a mild alkali, softens greasy residues and provides fine, non-scratching abrasion. Together they lift discolouration on the surface of cement-based grout, poking oxygen into tiny pores while the powder scours. The fizz you see is oxygen at work, gently loosening what the bristles will remove.
The paste also clings. That matters. Liquids run off walls and across floors; a paste stays put long enough to act, even on vertical shower joints or splashbacks. The slightly alkaline pH helps saponify residues, making them easier to rinse. And because baking soda crystals are soft, they don’t gouge the grout the way harsh scouring powders might. Speed comes from contact time plus micro-abrasion, not brute force.
There are limits. Avoid natural stone—marble, limestone, travertine—because alkalis and abrasives can etch or dull the surface. For coloured cementitious grout, the mix is generally safe, but always perform a patch test in a hidden area first. Epoxy grout is largely stain-resistant; you’ll clean its film rather than “whiten” it. The result still looks fresher, fast.
Step-By-Step Method for Sparkling Grout
Start with a simple ratio: 2 parts baking soda to 1 part 3% hydrogen peroxide. Mix in a small bowl until you have a spreadable, toothpaste-like paste. Optional: add a single drop of mild washing-up liquid to improve wetting. Make only what you’ll use in one session—the reaction is short-lived, and sealed storage can build pressure. Ventilate the room and wear light gloves if you have sensitive skin.
Apply the paste along grout lines using a spoon or old toothbrush. Let it dwell for 5–10 minutes—enough time for oxygen to work, not enough to dry rock-hard. Scrub with a dedicated grout brush in short, brisk strokes. Rinse thoroughly with warm water, then wipe down with a microfibre cloth. For stubborn patches, reapply and extend dwell time slightly, or repeat the scrub once more. Never mix this paste with bleach or vinegar; keep chemistry simple and safe.
For clarity, here’s a quick reference you can tape inside a cupboard.
| Item | Purpose | Amount/Timing | Notes |
|---|---|---|---|
| Baking soda | Mild abrasion, alkalinity | 2 parts | Soft scrub that won’t scratch ceramic |
| Hydrogen peroxide (3%) | Oxidises organic stains | 1 part | Use fresh; store bottle upright, away from light |
| Dwell time | Action window | 5–10 minutes | Do not let paste dry completely |
| Scrubbing | Mechanical lift | 1–3 minutes per m² | Use a nylon grout brush; avoid metal |
Troubleshooting, Safety, and What to Avoid
If the grout still looks blotchy after one pass, look closely at the stain type. Orange or pink film often signals biofilm; the paste works, but you may need a second cycle and better airflow. Dark, pin-prick mould rooted in porous joints can lighten dramatically, yet may return if humidity stays high. Address ventilation and drying, or stains will creep back. For very deep, age-set discolouration, consider a specialty oxygen cleaner or, as a last resort, regrouting a small area.
Safety is straightforward. Do not mix peroxide paste with bleach, ammonia, or vinegar. Keep the mixture away from natural stones and polished concrete. Use nylon, not steel wool or wire brushes. Make the paste fresh and discard leftovers in the sink with plenty of water. If you’re cleaning near a carpet or painted skirting, mask edges to prevent splashes. Patch test coloured grout and epoxy joints; you’re cleaning the surface, not seeking aggressive bleaching.
Water marks lingering after rinsing? That’s mineral residue. Wipe with a damp cloth, then buff dry. A final pass with a barely damp microfibre lifts haze beautifully. Once the grout is fully dry—ideally 24 hours later—apply a penetrating sealer to reduce future staining. Sealing won’t make grout bulletproof, but it buys you time and keeps future cleans faster.
Keeping Grout White: Smart Maintenance
The fastest clean is the one you barely need. After showers, a thirty-second squeegee on tiles and a towel wipe along grout lines blunts soap scum before it sets. Weekly, run a cloth dampened with warm water and a pinch of baking soda over high-use areas; rinse and dry. In kitchens, tackle spills straight away. Little and often wins. Moisture control is your best defence against staining and biofilm.
Set a simple rhythm. Vent fans on for 15 minutes after bathing. Keep a dedicated grout brush under the sink, not buried in a cupboard. Hard water? Consider a softening solution or a quick final rinse with filtered water to limit mineral spotting. When life gets busy, do a monthly peroxide-and-bicarb refresh on just the worst lines; target the shower corners and hob splash zone.
Don’t forget long-term protection. Reseal cementitious grout every 12–24 months depending on traffic and cleaning frequency. Choose a quality penetrating sealer and follow cure times. If you’re renovating, pick mid-tone grout for floors, which hides day-to-day scuffs yet still cleans brilliantly with the same paste. Consistency, not intensity, keeps grout bright without heavy chemicals or drama.
Used well, the hydrogen peroxide and baking soda paste is a small domestic marvel: cheap, quick, and surprisingly powerful on tired grout. It leans on simple chemistry and smart technique, not harsh fumes or risky mixes. Keep your tools handy, let the paste sit, scrub with intent, rinse, and dry—the colour snaps back. With a light maintenance routine, that fresh look actually lasts. What’s your biggest grout challenge right now, and where could a five-minute paste-and-brush blitz make the most difference in your home?
Did you like it?4.4/5 (24)