In a nutshell
- 🥥🍋 Why it works: Coconut oil conditions fibres while lemon juice gently lifts grime, enhancing grain and giving a natural, even sheen—less is more.
- ⚗️ Mixing and prep: Use a 3:1 ratio (coconut oil to lemon juice); optionally add 0.5 part white vinegar; strain juice, dust thoroughly, and never soak wood.
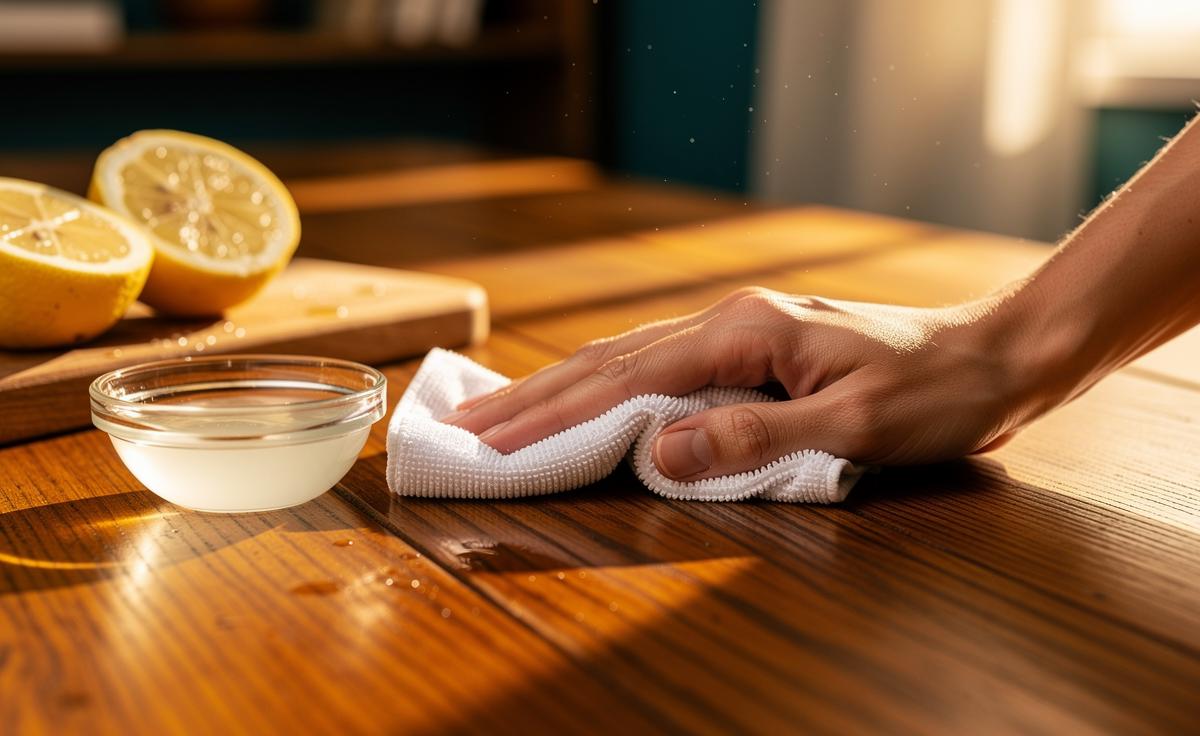
- 🧽 Application: Wipe on with a lint-free cloth, then follow the grain; wait 5–10 minutes and buff briskly; spot-treat water rings and reduce tackiness by using less product.
- ⚠️ When not to use: Avoid fresh lacquer, French polish, and heavily waxed finishes; be cautious with veneers and test on a hidden patch before committing.
- 🗓️ Care and storage: Dust weekly; polish every 1–3 months; make small, fresh batches and store cool; remember polish enhances—it doesn’t repair.
There’s a quiet satisfaction in reviving tired timber without resorting to harsh chemicals. A simple blend of coconut oil and lemon juice can lift grime, feed dry fibres, and coax out an elegant glow from oak, walnut, pine, and more. It’s quick. It’s inexpensive. And it smells like a summer pantry, not a paint shop. Used thoughtfully, this pantry polish respects patina while brightening colour and clarity. Always test on a hidden patch first, noting how the finish reacts and whether the wood deepens more than you’d like. With a soft cloth, a steady hand, and a little patience, you can make old furniture look loved again.
Why Coconut Oil and Lemon Juice Work on Wood
Wood responds to nourishment. The fibres expand and settle, reflecting light more evenly when they’re conditioned. Coconut oil, rich in saturated fats, is naturally stable and less prone to rancidity than many vegetable oils, so it’s a safer bet for surfaces you polish infrequently. It penetrates lightly and softens dry finishes, helping to quiet minor scratches by reducing contrast. Meanwhile, lemon juice adds a gentle acidity that lifts fingerprints, cooking film, and dusty build-up, leaving the surface clearer and brighter without an aggressive chemical bite.
Think of the mixture as polish and cleaner in one. The oil restores suppleness, while the lemon’s mild solvent action helps the sheen appear more even. Less is more with wood care: an overloaded surface will look smeary and may attract dust. When applied thinly and buffed briskly, the blend can enhance depth, emphasise grain, and revive the mellow glow that makes old furniture feel special rather than merely shiny.
There are limits. High-gloss lacquer, French-polished shellac, or heavily waxed surfaces may not welcome acids or additional oil. If in doubt, test—then wait an hour and check again. Veneered pieces can be polished successfully, but avoid letting liquid pool at edges or seams. Softwoods often drink faster; hardwoods can need a touch more buffing. The principle remains the same: clean lightly, condition sparingly, and bring up the shine with a dry cloth and elbow grease.
Preparing the Furniture and Mixing the Polish
Preparation determines everything. Start by dusting thoroughly with a microfibre cloth. Dislodge grit from carvings and joints using a soft brush; you don’t want abrasive particles scouring the finish while you polish. If the surface is sticky, a barely damp cloth with a drop of mild washing-up liquid can help—dry immediately. Never soak wood. For the polish, warm firm coconut oil gently until soft, not liquid-hot. Fresh lemon juice works best, strained to remove pulp. A small jam jar makes an ideal mixing pot and storage vessel.
| Ingredient | Purpose | Ratio | Notes |
|---|---|---|---|
| Coconut oil (refined) | Conditions, enriches grain | 3 parts | Refined has a lighter odour; soften gently before mixing. |
| Lemon juice (fresh) | Lifts film, brightens | 1 part | Strain well to avoid bits; acidity is mild but effective. |
| Optional: white vinegar | Extra degreasing | 0.5 part | Skip on shellac or delicate finishes. |
| Optional: essential oil | Scent only | 3–5 drops | Choose wood-safe oils; avoid overuse. |
Stir until glossy and uniform. If it separates on standing, that’s fine—shake before each use. Make only what you’ll use in a week. Fresh is best for consistent results. Keep the jar cool and out of sunlight. If you prefer a firmer balm, increase the coconut oil slightly; for a lighter wipe, thin with a touch more lemon juice, but stay conservative to protect finishes.
Step-by-Step Application for a Lasting Sheen
Work in daylight if possible; good light reveals streaks before they set. Dip a lint-free cloth into the mixture and squeeze until only lightly damp. You want a whisper of polish, not a slick. Starting at a back corner, apply in long strokes following the grain. Circular motions can be effective on table tops, but finish with straight passes to align the sheen. Always follow the grain when you finalise the coat to keep reflections tidy and professional.
Leave the surface for five to ten minutes. This resting time lets the oil settle and the lemon lift any last smudges. Now buff hard with a clean, dry cloth—fresh cotton works brilliantly. Change to a new section of cloth as it loads up; a clogged rag just moves residue around. Edges, handles, and turned legs deserve special attention. These high-touch zones respond beautifully to extra buffing, popping with a subtle, tactile glow rather than a plastic glare.
Stubborn water rings and dull patches? Apply a pea-sized dab to the spot, wait two minutes, then buff briskly. Repeat once if needed. If the surface feels tacky after 20 minutes, you’ve used too much. Wipe with a barely damp cloth, dry, and rebuff. Finish by standing back and inspecting from different angles. You’re looking for an even, lively reflection, not a wet look. Dress the room with softer light and the furniture will reward you with depth and character.
Care, Troubleshooting, and When Not to Use It
Routine makes maintenance effortless. Dust weekly; polish lightly every one to three months depending on central heating, sun exposure, and use. Dining tables may appreciate monthly attention; display cabinets less often. Avoid heat and moisture: coasters protect your hard-earned sheen. For everyday marks, a dry cloth is your first resort. If fingerprints build, a single pass with the polish—very thin—refreshes clarity without loading the surface.
Common issues have simple fixes. Streaks indicate excess oil; rebuff with a clean cloth. Cloudiness after polishing suggests residue beneath—wipe lightly with a damp cloth, dry, then reapply a scant amount. Do not use this method on fresh lacquer, French polish, or water-sensitive finishes, as even mild acidity can mark them. For antique pieces of high value or unknown finishes, consult a professional restorer. Veneers and marquetry are fair game, but respect edges; liquid creeping into joints can weaken glue lines.
Storage matters. Keep your mixture sealed and cool, and make small batches. Coconut oil’s stability is a friend here, but cleanliness counts—use clean spoons and cloths. If the scent changes or the mixture looks odd, discard. Finally, remember that polish enhances; it doesn’t repair. Deep scratches, white heat marks, or lifting finish need specialist treatment. Polish sparingly, buff thoroughly, and let the wood, not the product, do the talking. That restraint is the secret to a natural, confident glow.
Coconut oil and lemon juice bring craft back to care, marrying gentle cleaning with quiet nourishment. They’re frugal, tactile, and forgiving when used with a light hand. Your furniture will look refreshed rather than lacquered, its grain reading as texture and story, not gloss. Keep your cloths clean, your batches small, and your touch respectful. The reward is a glow that deepens over time, not a quick shine that fades. Which piece in your home is quietly asking for fifteen minutes, a soft cloth, and this simple, satisfying polish?
Did you like it?4.4/5 (26)