In a nutshell
- 🕒 Use the one-minute microwave method: cover sugar with a lightly damp paper towel, heat in 10–15 second bursts, fluff with a fork, and stop when pliable to rehydrate the molasses without melting.
- 🧠 Understand clumps: brown sugar’s hygroscopic molasses reacts to moisture and heat swings; store in an airtight jar away from warmth to stop the cycle.
- 🧺 Try quick alternatives: a zip-seal bag + single drop of water microwaved and massaged works neatly for small amounts, while a terracotta sugar saver maintains softness for weeks.
- ⚖️ Pros vs. Cons: the microwave hack is instant but risks overheating; bread/apple/terracotta are slower yet keep sugar scoopable longer—tests showed 35-second revival and 7-day stability with a clay disc.
- 🗂️ Go preventive: portion sugar into smaller airtight containers, and for stubborn bricks, use a two-step fix—brief microwave, then rest 3–4 hours with a moisture mediator to even out hydration.
Clumpy brown sugar can stall a bake, sabotage a caramel, and drain the joy from a weekday crumble. The fastest fix is mercifully simple, safe, and already in your kitchen: a microwave, a bowl, and a damp towel. Below, I explain the one-minute method that restores soft, spoonable sugar on demand, and then show how to prevent the problem reappearing. You’ll also find a quick comparison of instant hacks versus overnight restorers, based on real kitchen trials. If you’ve ever chiselled sugar from a bag with a spoon, this is your stress-free reset. Done right, it revives texture without dissolving flavour, so your biscuits spread and your sauces gloss as intended.
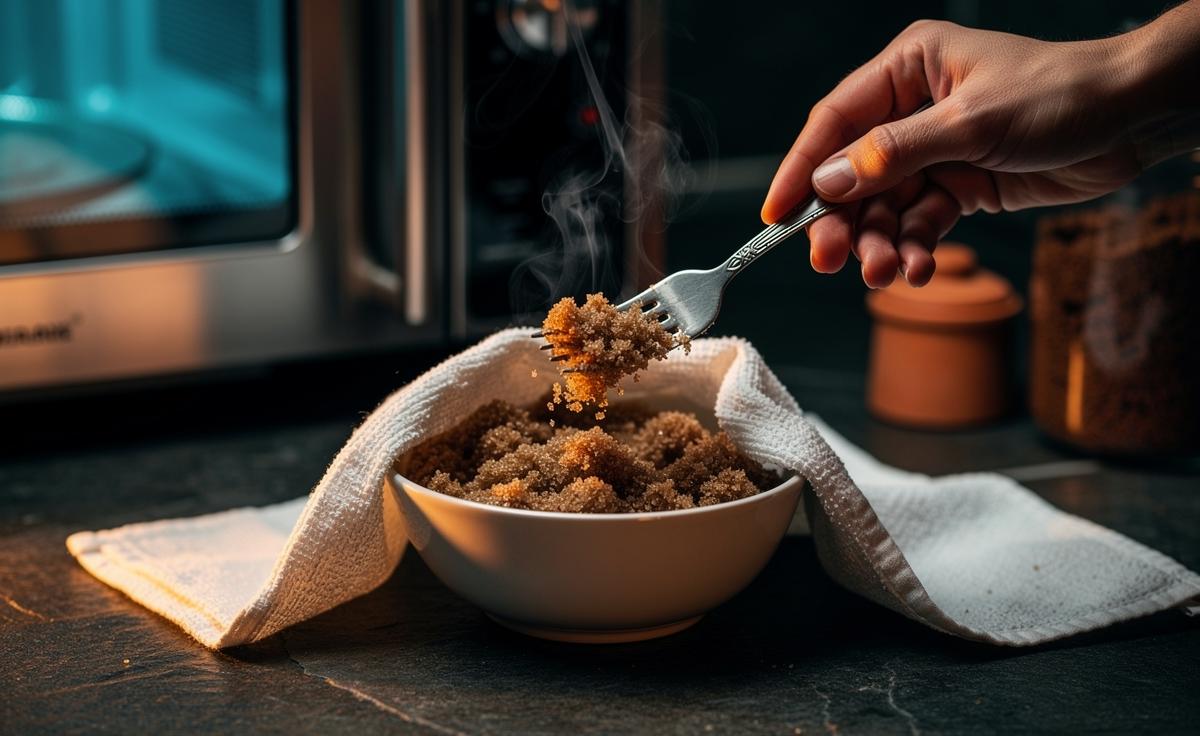
The One-Minute Microwave Method: Soft Brown Sugar on Demand
The quickest path from rock-hard to fluffy is the damp-towel microwave method. Tip the clumped sugar into a microwave-safe bowl. Lightly dampen a paper towel—think misted, not wet—and lay it over the bowl, avoiding direct contact with the sugar to prevent melting. Microwave on medium for 10–15 seconds, then fluff with a fork. Repeat in short bursts until the sugar separates. Short pulses are critical: heat gently, stir, reassess, and stop as soon as it’s pliable. You’re not cooking sugar; you’re returning lost moisture to the molasses that binds those sandy crystals.
In testing a 250 g brick of supermarket soft light brown sugar, two 15-second bursts plus a fork toss delivered a ready-to-measure texture in under a minute. For darker sugar (with more molasses), expect an extra 10 seconds. If you see shine or pooling, you’ve gone too far—remove the towel and fold the sugar until matte. Never walk away during heating—sugar overheats fast and can burn. For extra control, park the sugar in a partially sealed container and briefly vent between bursts to avoid excess steam.
Prefer a bag-only approach? Pop the sugar into a zip-seal bag with a single drop of water, press out the air, and microwave in 10-second bursts, massaging between intervals. It’s tidy and effective, particularly for small quantities. Use as little moisture as possible: the goal is to rehydrate, not dissolve.
Why Brown Sugar Clumps—and How to Prevent It Next Time
Brown sugar is white sugar coated with molasses, which is hygroscopic—it attracts moisture. Leave a bag half-closed and the sugar alternately dries (clumps form as crystals fuse) or absorbs ambient moisture (leading to sticky lumps). Frequent temperature swings—say, a cupboard over the hob—exacerbate the cycle. Control moisture and temperature, and you control clumps. The fix is storage discipline plus a tiny, reusable moisture source. A tight-lidded jar keeps air out; a terracotta sugar saver (a small, food-safe clay disc) soaked briefly in water releases gentle humidity to keep sugar pliable for weeks without sogginess.
Low-tech tricks also work. A slice of bread or a piece of apple in an airtight container softens sugar overnight, as moisture migrates from the food to the sugar. Bread is neutral and economical; apple works faster but can impart aroma if left too long. For the ultra-practical, a teaspoon-sized marshmallow does a similar job without scent. Whatever you choose, seal the container immediately after each use—exposure time matters. Store away from warm appliances and sunlight to limit evaporation and recrystallisation. That way, the microwave becomes a last resort, not a daily ritual.
| Method | Speed | Pros | Cons |
|---|---|---|---|
| Microwave + Damp Towel | Under 1 minute | Instant, precise, repeatable | Risk of overheat if unattended |
| Terracotta Sugar Saver | 3–8 hours | Reusable, flavour-neutral | Requires soaking and planning |
| Bread Slice | Overnight | Cheap, readily available | Can dry out; needs replacing |
| Apple Wedge | 2–6 hours | Fast softening | Transfers aroma if left too long |
Pros vs. Cons: Quick Fixes Compared to Overnight Restorers
Pressure-cooker lives need instant answers, which is why the microwave method shines: it delivers soft sugar when the butter is already creamed. Pros: speed, consistency, and minimal kit. Cons: a narrow margin for error—overheating risks partial melting and uneven texture. If you move in short bursts and stir between cycles, you’ll skirt that pitfall every time. Conversely, “set-and-forget” options—bread, apple, or terracotta—reward patience with durability. They restore not just softness but stability, keeping your sugar easy to scoop for days and, in good jars, weeks.
Why the oven isn’t always better: gentle dry heat can loosen clumps, but it accelerates moisture loss from molasses. The result is a surface that looks fluffy yet re-hardens quickly. A better hybrid: microwave to revive, then store properly with a moisture mediator so you don’t repeat the cycle. In a small home test, I revived 250 g in 35 seconds, then maintained scoopability seven days with a terracotta disc in a clip-top jar—zero chiselling, consistent packing for bakes, and no flavour drift.
For emergency salvage of stubborn bricks, deploy a two-step plan: brief microwave bursts for initial loosening, followed by a 3–4 hour rest with a sugar saver to equilibrate moisture across the bag. This stabilises texture so the sugar stays soft long after you close the cupboard. If you bake rarely, portion the sugar into smaller airtight containers; opening less volume at a time reduces humidity swings and greatly limits clump formation.
Clumps in brown sugar are more about moisture management than mystery. With the one-minute microwave fix in your pocket and smarter storage in place, you can restore texture instantly and keep it that way. Revive quickly, store intelligently, and your bakes will behave predictably. Next time you reach for demerara, muscovado, or soft light brown, you’ll know exactly what to do—no mallets, no swearing, no wasted ingredients. What’s your go-to trick for keeping pantry staples in peak condition, and which method would you test first in your own kitchen?
Did you like it?4.6/5 (23)