In a nutshell
- 🥥 The overnight coconut oil balm softens cracked heels fast by acting as an occlusive, reducing TEWL; lauric acid offers gentle antimicrobial support.
- 🧪 DIY recipe: melt virgin coconut oil with beeswax/candelilla wax, whisk in glycerin, optionally add 10% urea; aim for a glide-not-slide texture and patch test fragrances.
- 🧦 Night routine: pre-soak, gentle filing, apply balm, then occlude with cotton socks; do a morning reset and keep consistency for multi-day improvements.
- ⚖️ Pros vs Cons: Great occlusion, value, blendability vs greasiness, not for fungal infections, allergy/maceration risks; consider petrolatum, shea butter, or 10–25% urea creams as alternatives.
- 🩺 Safety & tips: use a humectant + balm “sandwich”, clean tools, add heel cups, and adjust footwear; seek help for diabetes/neuropathy or infection signs—consult a GP/podiatrist.
Winter pavements and summer sandals have one thing in common: they punish neglected feet. If your heels are cracked, sore, and snagging on socks, a kitchen-cupboard remedy may be your quiet revolution. The overnight coconut oil balm routine has surged across British bathrooms because it’s affordable, soothing, and simple to master. As a UK journalist accustomed to testing fixes on deadline, I’ve learned that the right night-time occlusion can transform heels by morning. Below, I break down what’s happening under the skin, how to blend a balanced balm, and the small tweaks that turn “nice idea” into “why didn’t I do this sooner?”
What Makes Coconut Oil a Heel-Healing Powerhouse
Cracked heels are often the result of compromised barrier function, where the skin loses water faster than it can replenish it. Virgin coconut oil is rich in medium-chain fatty acids—especially lauric acid—which behaves as a gentle antimicrobial and a superb occlusive. That means it slows transepidermal water loss (TEWL), letting the skin’s own repair enzymes work undisturbed. When you trap hydration overnight, the hardened rim of a fissure softens and the micro-tears feel less sore by morning. Unlike lighter lotions, coconut oil sits on the surface long enough to guard against friction from bedding and socks.
There’s also a compatibility story: coconut oil blends well with humectants like glycerin and with keratolytics (think urea creams) that dissolve dead skin strategically. Combine occlusion plus gentle exfoliation and you get a neat one-two: softened callus and calmer inflammation. If your heels are prone to minor splits after a long run or a cold spell, this method builds resilience across the week, not just a short-lived gloss. The key is consistency and light exfoliation, not brute-force scraping.
How to Make the Overnight Balm at Home
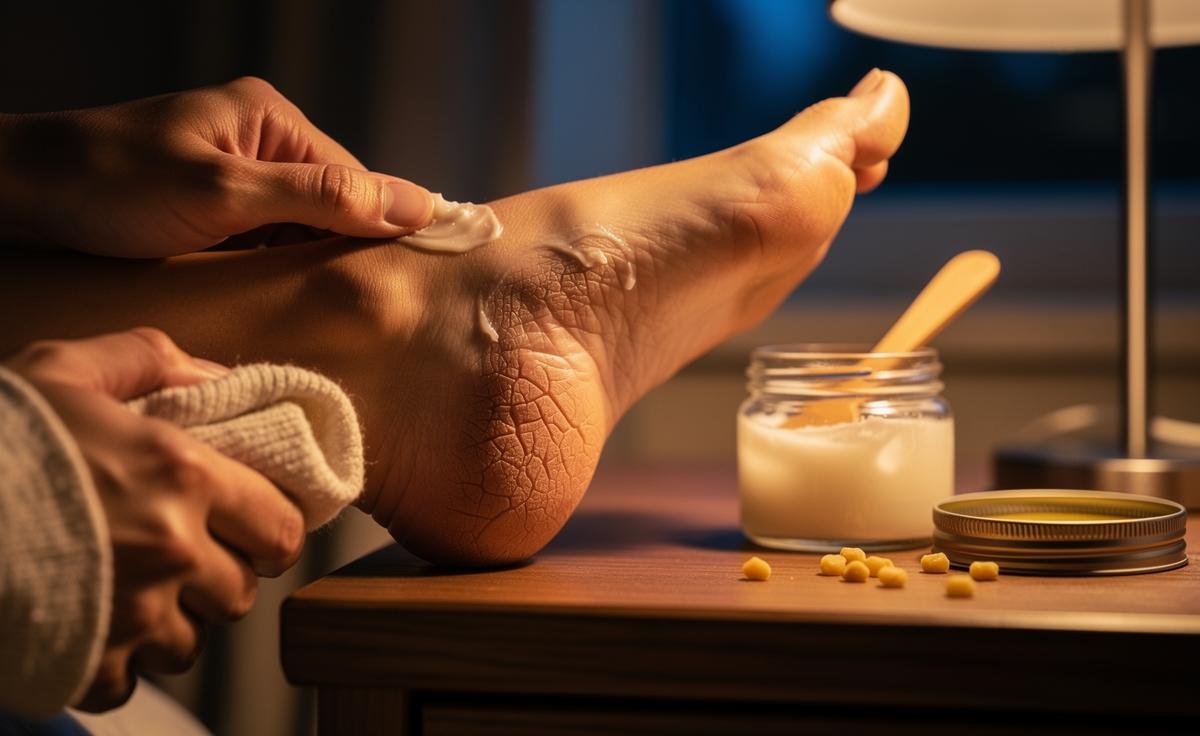
You can craft a salon-worthy balm in ten minutes. Aim for a texture that’s firm in the jar but melts on contact. Start with virgin coconut oil for slip and occlusion, add a touch of beeswax (or candelilla wax for a vegan option) for staying power, and round it out with glycerin for water-binding. Optional: blend in a pea-sized amount of a shop-bought 10% urea cream to support gentle exfoliation. Always patch test if you’re adding fragrance or essential oils.
| Ingredient | Function | Typical UK Cost | Notes |
|---|---|---|---|
| Virgin coconut oil (2 tbsp) | Occlusive; softens callus | £3–£6/300ml | Choose cold-pressed for aroma; refined for less scent |
| Beeswax/candelilla wax (1 tsp) | Thickens; boosts longevity | £2–£5/100g | Vegan? Use candelilla; slightly firmer set |
| Glycerin (1 tsp) | Humectant; draws moisture in | £1–£3/100ml | Mix well to avoid separation |
| Urea cream 10% (pea-sized) | Keratolytic; smooths rough skin | £3–£7/100ml | Optional add-in; do not overdo |
Method: Gently melt the wax and coconut oil over a low heat or in a double boiler. Remove from heat, whisk in glycerin, and cool for 2–3 minutes before stirring in urea cream. Decant into a small tin. The finished balm should glide, not slide—if it feels greasy, add a pinch more wax next batch. Keep the lid on, away from strong sunlight.
Step-by-Step Night Routine for Faster Results
The right choreography makes the balm work harder while you sleep. Think of it as a three-act play: pre-soak, smooth, seal. On nights when your feet have been trapped in trainers, give them five minutes’ attention and they’ll pay you back by morning.
- Pre-soak (5–7 minutes): Warm water plus a splash of mild soap. Pat dry, leaving skin slightly damp.
- Gentle exfoliation: Use a soft foot file or pumice on the thickest areas only. No aggressive scraping.
- Apply balm: Massage a pea-sized amount per heel, focusing on the crack edges, not the raw centre.
- Occlude: Slip on cotton socks. For very stubborn heels, layer a thin cotton sock under a loose, clean wool sock for warmth.
- Morning reset: Rinse briefly, pat dry, and apply a light, non-greasy moisturiser to maintain gains.
Field note: during a long reporting stint on Cornwall’s coast, I tested this on wind-chapped heels after sand-and-sea days. By the first morning the tightness eased; by day three the greyish rim of hard skin looked visibly smoother. A practical cadence: balm nightly for four nights, then twice weekly to maintain. If a crack is actively bleeding, pause exfoliation and keep the area clean, using the balm at the edges, not inside the fissure.
Pros and Cons: Why Coconut Oil Isn’t Always Better
There’s a romance to natural oils, but the smartest fix is the one that suits your skin, schedule, and shoes. Here’s the clear-eyed take I share with readers who email me photos from commuter platforms and hiking trails.
- Pros:
- Occlusive power that rivals pricier balms for overnight repair.
- Antimicrobial profile of lauric acid helps keep minor splits cleaner.
- Blendability: pairs beautifully with glycerin and urea for a custom finish.
- Value: low-cost, widely available in UK supermarkets and chemists.
- Cons:
- Can feel greasy or transfer to bedding if overapplied.
- Not a cure for fungal infections; persistent scaling may need an antifungal.
- Allergy risk for those sensitive to nut or plant oils—patch test first.
- Over-occlusion can cause maceration if cracks are deep or damp.
Alternatives worth testing: petrolatum (excellent occlusion, fragrance-free), shea butter (buttery glide), or a nightly 10–25% urea cream without added oils. If your heels are severely split, tender, or show signs of infection, skip DIY and speak to a GP or podiatrist. The winner isn’t the trendiest ingredient—it’s the one you’ll use consistently and safely.
Expert Tips, Safety Notes, and When to See a Professional
Small adjustments amplify results. Warm your balm between palms for ten seconds to improve spread. Layer a water-based humectant (aloe gel or a light urea lotion) underneath, then seal with your coconut balm—this “sandwich” locks hydration in place. Change socks nightly and keep files clean to avoid trapping bacteria. If you stand all day, add heel cups to reduce mechanical stress that reopens fissures.
Safety first: those with diabetes, neuropathy, or poor circulation should avoid aggressive filing and seek professional foot care. Red flags include warmth, swelling, odour, or pus. For widespread chalky scaling that doesn’t respond to moisturisers, consider athlete’s foot (moccasin-type)—you’ll need an antifungal, not just oil. And don’t ignore footwear: rigid backless shoes can worsen heel splitting; swap for supportive trainers or boots while you heal. Finally, stay hydrated and add a simple evening foot stretch; tight calves increase heel stress with every step.
Call it kitchen science with newsroom pragmatism: a well-built overnight coconut oil balm can take cracked heels from “ouch” to “ahh” astonishingly fast when matched with smart prep and a bit of patience. Consistency, clean technique, and the right socks are the unsung heroes. I’ll keep testing tweaks—from vegan wax ratios to sock fibres—but the core remains comfortingly simple and budget-friendly. What will you change tonight—your balm recipe, your sock strategy, or your pre-soak routine—to wake up to calmer, softer heels tomorrow?
Did you like it?4.5/5 (24)