In a nutshell
- ❄️ The chill technique pairs a warm soak with a wrapped ice cube to reduce friction via vasoconstriction, offering gentle, mechanical micro-exfoliation and a brief analgesic effect for smoother heels.
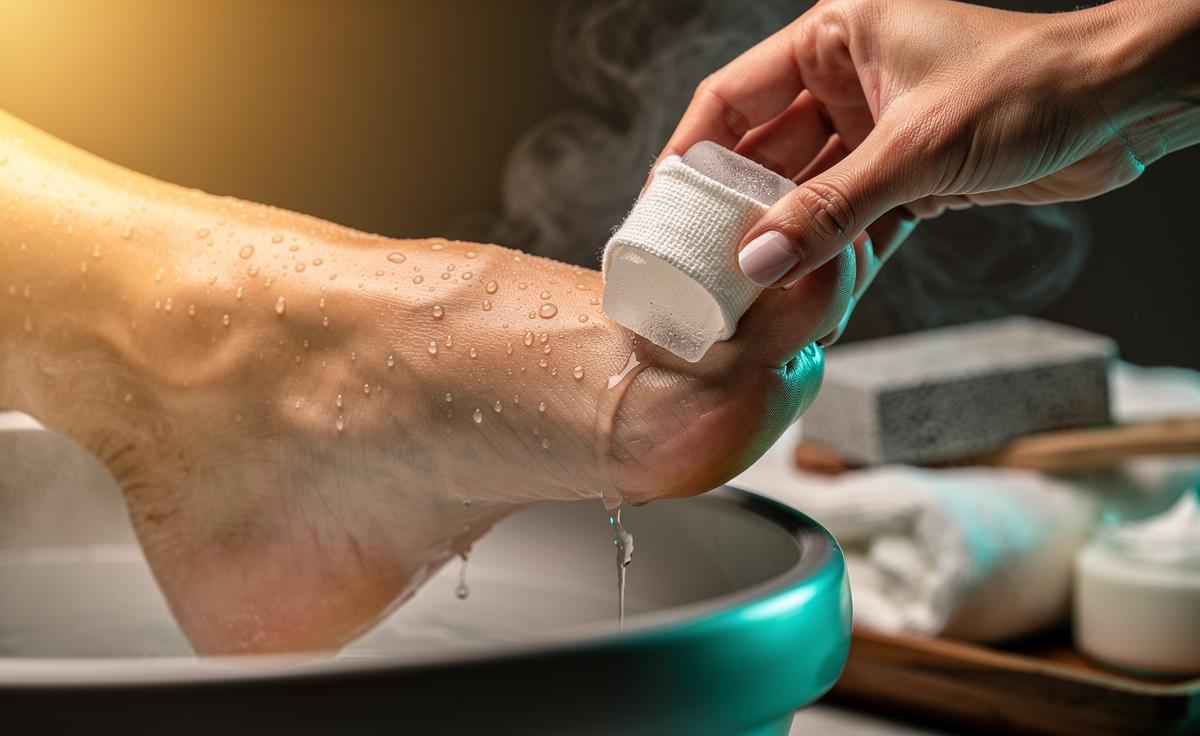
- 🧼 Step-by-step: soak feet 8–10 minutes, glide a wrapped ice cube 30–45 seconds per area, then use a light pumice/washcloth; rinse, moisturise, and wear cotton socks—repeat 2–3× weekly without overdoing.
- 🧪 Lock in softness with urea 10–20% or lactic acid 5–12% creams; consider occlusive socks to boost penetration and maintain hydration between sessions.
- ⚖️ Pros vs. Cons: low-cost, less abrasive, and post-run friendly, but not for deep cracks; avoid if you have Raynaud’s, diabetes, or neuropathy, and never hold ice in one spot too long due to cold injury risk.
- 👟 Big picture: the method is a primer, not a cure—address footwear fit, training load, and hydration; consistency beats force for lasting, baby-soft feet.
In beauty reporting, every so often a homespun trick earns a second look because it makes tactile sense. The chill technique for feet is one of those: a short, deliberate pass of ice cubes after a warm soak to coax away roughness without hacking at your heels. The cold doesn’t dissolve skin; it primes it. Brief vasoconstriction firms the surface, friction is reduced, and the loosened layer slides off with a cloth or pumice. Never use ice straight on skin for an extended period, but used judiciously, this cooling step can leave the stratum corneum smoother, calmer, and more receptive to moisturiser. Here’s how it works—and how to do it safely at home.
How the Chill Technique Works on Skin Biology
Foot roughness builds when compacted keratin in the stratum corneum thickens into calluses. Traditional scrubbing can create micro-tears and inflammation, especially if the skin is dry or you’re heavy-handed. A brief application of cold changes the dynamics. Vasoconstriction tightens capillaries, reducing surface swelling and sensitivity, while the cool, slick meltwater from an ice cube lowers friction as you glide over the heel. Think of it as mechanical micro-exfoliation with less drag. After a prior warm soak, corneocytes are hydrated and loosened; the chill firms the surface so dead cells detach more cleanly when wiped away. The net effect is a finer finish with less redness.
There’s also a comfort dividend. Cold provides a short-acting analgesic effect, which can make a cautious pass with a pumice or washcloth feel tolerable on tender areas. And because cold briefly quiets inflammatory mediators, post-rub-down irritation is dialled down. Do not mistake this for a cure for deep fissures or medical conditions—ice is a primer, not a panacea. If your heels are cracked to bleeding, diabetic, or neuropathic, seek professional care before attempting any exfoliation protocol.
Step-By-Step: Ice-Assisted Exfoliation for Softer Heels
Start clean. Soak feet in warm (not hot) water for 8–10 minutes with a teaspoon of sea salt or a drop of mild soap; this hydrates and loosens the outer layer. Pat until just damp. Wrap an ice cube in thin muslin or a paper towel—this barrier slows extreme cold and prevents sticking. Now, in slow circles, sweep over each heel and ball of the foot for 30–45 seconds per zone. You want a cool, slightly numbing feel, not pain. Immediately follow with a soft washcloth or pumice stone to lift the loosened cells in light, single-direction strokes.
Rinse, then seal the result. Massage in a pea-sized blob of urea (10–20%) or lactic acid (5–12%) cream; these humectant exfoliants keep progress going without abrasion. Pop on cotton socks for an hour to lock moisture in. Repeat the routine two to three times weekly—more risks over-thinning. Never hold ice static on one spot for more than 60 seconds, and skip any skin that’s numb, broken, or discoloured. For runners or anyone on their feet all day, a quick evening chill session can also deflate end-of-day puffiness.
| Tool | Time | Purpose |
|---|---|---|
| Warm soak | 8–10 min | Hydrates and loosens dead skin |
| Ice cube (wrapped) | 30–45 sec/area | Reduces friction; numbs; firms surface |
| Pumice/washcloth | 30–60 sec | Gently removes loosened cells |
| Urea/lactic cream | 1–2 min | Rehydrates; prevents re-thickening |
Pros vs. Cons: Why Cold Isn’t Always Better
On the plus side, the chill technique is cheap, fast, and less abrasive than dry filing. It pairs well with chemical softeners and suits people whose feet flush or sting after traditional scrubs. There’s a practical advantage too: the icy glide reduces snagging on micro-cracks, producing a more even finish. In my reporting notebook, a Yorkshire marathoner described using a wrapped ice cube post-run: “The cool made pumice tolerable, and my heels looked tidy without that angry pink.” After two weeks, she needed fewer heavy file sessions and leaned on urea cream for maintenance.
There are caveats. Cold is a tool, not a license to overdo. If you have Raynaud’s phenomenon, diabetes, peripheral vascular disease, or any neuropathy, skip ice and consult a podiatrist—reduced sensation can mask injury. Even for healthy skin, freezing temperatures held too long risk cold injury. The method won’t melt thick, protective calluses overnight; you’ll still need periodic gentle filing or a professional visit for severe build-up. And while cold calms flare-ups, it won’t correct biomechanical triggers—ill-fitting shoes, mileage spikes, or dehydrating environments still need attention.
- Best for: Mild roughness, post-run soothing, in-between pedicures.
- Not ideal for: Deep cracks, circulatory issues, numb or broken skin.
- Frequency: 2–3 times weekly; maintain daily with emollients.
- Upgrade: Add occlusive socks after cream to lock moisture.
Used thoughtfully, a wrapped ice cube can be a surprisingly elegant partner to warm water, gentle friction, and smart moisturising—leaving feet softer without the collateral damage of over-scrubbing. It’s the contrast—the warm soak, the brief cold, the light buff—that delivers a polished, resilient result and helps creams work harder overnight. Listen to your skin, stop at the first sign of pain, and remember that consistency beats force. If you try the chill technique this week, what tweaks—different timings, creams, or tools—will you experiment with to make it your own?
Did you like it?4.5/5 (23)